Journal
What is a dieline? A plain-English guide to box templates
What is a dieline?
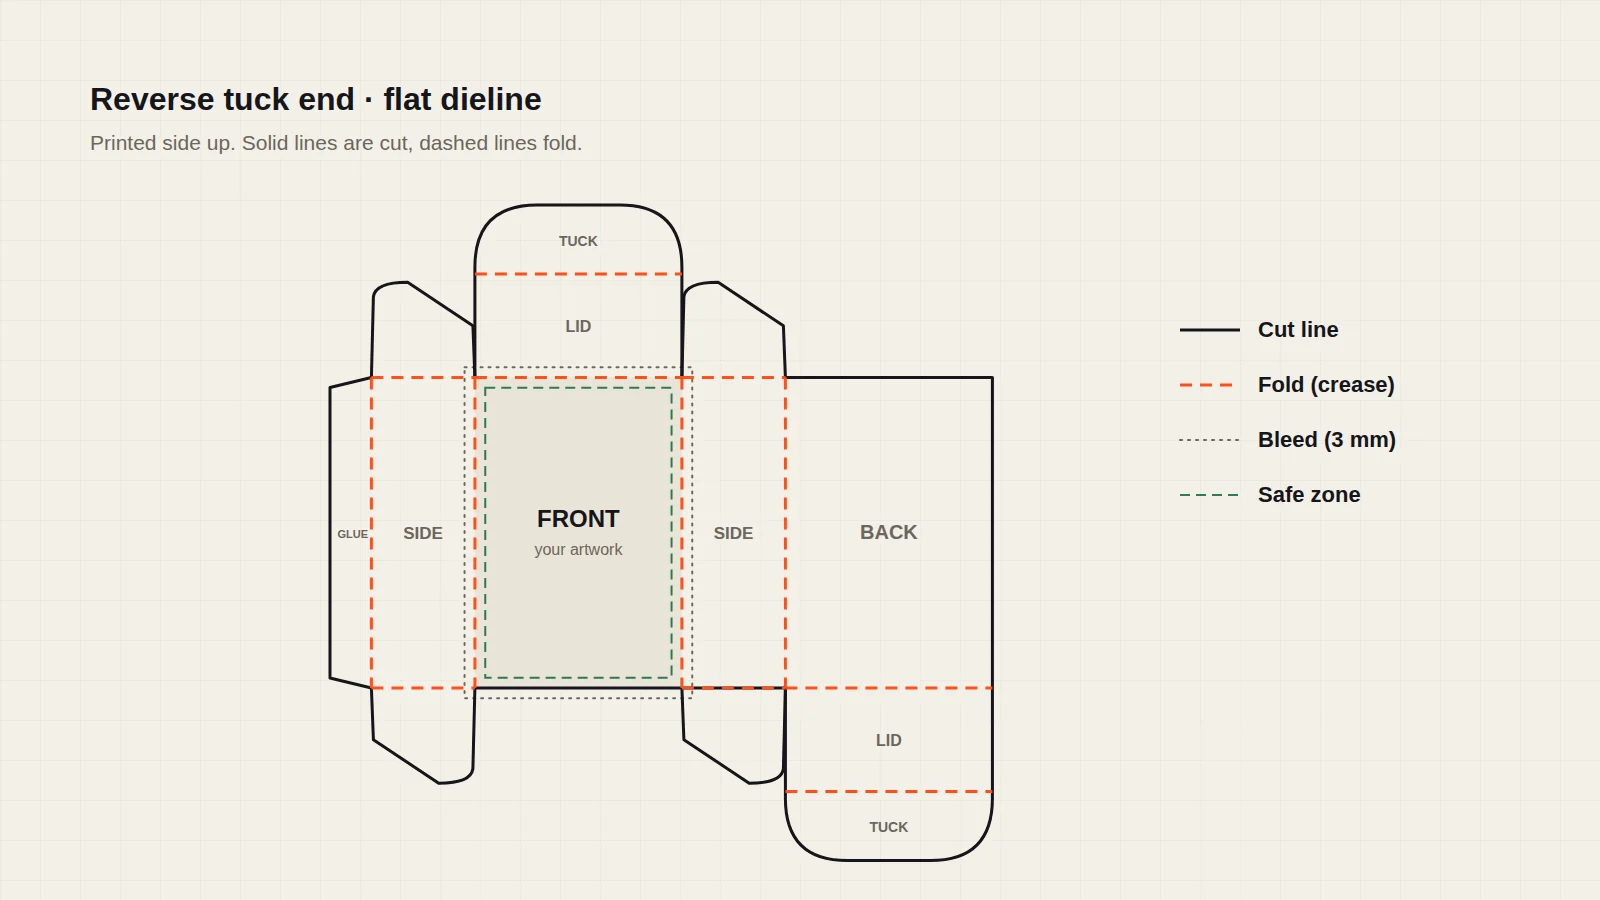
A dieline is the flat, unfolded outline of a box, drawn to its exact size. It shows the printer — and you — where the board will be cut, where it will fold and where it is glued. The name comes from the cutting die: a steel-rule tool made from this drawing that cuts and creases every sheet in one press.
For the designer, the dieline is the canvas. Artwork is placed on top of it so that the logo lands on the front panel, the text sits the right way up once the box is folded and nothing important disappears into a fold or a glue flap.
The lines on a dieline
Every dieline uses a small set of line types. Colours vary between printers, but the meaning is the same:
| Line | What it means | What to do with artwork |
|---|---|---|
| Cut line | The outer edge of the box and any window or hang hole — the die cuts right through the board here. | Extend background colour and images past it into the bleed. |
| Fold (crease) | A pressed line where the board bends. Usually drawn dashed. | Keep text and fine detail a few millimetres away so it does not crack or wrap around the edge. |
| Perforation | A line of small cuts so a panel tears off by hand. | Avoid placing small text across it. |
| Bleed | Artwork that runs past the cut line — typically 3 mm (about 1/8 in). | Fill it so no thin white edge shows if the cut shifts slightly. |
| Safe zone | An inner margin, typically 3–5 mm inside cuts and folds. | Keep logos, text, barcodes and QR codes inside it. |
| Glue area | The flap or strip where the box is glued closed. | Leave unprinted if possible; ink and varnish can weaken the glue joint. |
How a dieline is sized
Box sizes are normally given as length × width × height, measured on the inside of the box — the space your product actually has. Length and width describe the opening; height is the depth. A 100 × 50 × 150 mm tuck end box, for example, opens on its 100 × 50 mm end.
The person drawing the dieline then adds allowances for the thickness of the board, so the panels fold around the product without squeezing it. Thick corrugated or rigid board needs more allowance than thin cardstock, which is why a dieline drawn for one material should not simply be reused for another.
If you are unsure how to measure your product, our guide on how to measure a box walks through it step by step.
Setting up artwork on a dieline
- Keep the dieline on its own layer, named clearly, and never merge it into the artwork. It guides the cutting tool; it is not printed.
- Work in vector where you can. Logos, text and line art stay sharp at any size. Place photos at 300 dpi at the printed size.
- Use CMYK for full-colour print, and name any spot (Pantone) colours exactly as you want them matched.
- Fill the bleed on every outer edge and around windows.
- Check which way up each panel is. On tuck end boxes some panels are upside down on the flat sheet; the 3D preview makes this obvious.
- Outline fonts or send them with the file so the text prints exactly as designed.
We accept .ai, .pdf, .eps, .psd and .cdr files at 300 dpi.
Five common dieline mistakes
- Outside dimensions supplied as inside dimensions. The box comes out a few millimetres too big or too small.
- Text across a fold. It wraps around the edge and becomes hard to read.
- No bleed. A thin white line appears where the cut drifts.
- Barcode too close to a fold or edge. Scanners may fail to read it.
- A dieline reused from a different board. Panels no longer meet cleanly because the thickness allowance is wrong.
Dielines for common box styles
Each box style has its own dieline shape. A few of the most common:
- Reverse tuck end boxes — the tuck flaps close at opposite ends (the illustration above). Straight tuck end boxes close both ends on the same side.
- Auto-bottom boxes — a pre-glued base that snaps into place, useful for heavier products.
- Mailer boxes — a one-piece corrugated design with a hinged lid and dust flaps.
- Pillow boxes — curved ends that fold in along arc-shaped creases.
- Sleeve and tray boxes — two dielines: one for the tray, one for the sleeve.
- Rigid boxes — a dieline for the wrap paper that covers thick grey board. Our guide to rigid boxes explains the construction.
For pictures of each style and when to use it, see box styles explained.
Getting a dieline from Pressholic
You do not need to draw a dieline yourself. Send the product size (or the box size you want), the box style and the quantity through the quote form, and our design team sets up the dieline at no charge. Every box is cut from a fresh dieline to your size — there are no stock sizes to fit into.
Once your artwork is on the dieline, you receive a free digital proof — a flat mock-up and a 3D view — and nothing is printed until you approve it. Production then takes 7–14 working days.
Frequently asked questions
Is a dieline the same as a box template?
Yes — the terms are used interchangeably. "Template" is common among designers; "dieline" is the printer's word, because the cutting die is made from it.
Does the dieline get printed on the box?
No. The dieline sits on its own layer and only guides cutting and creasing. Keep it on a separate, clearly named layer so it cannot be printed by mistake.
What file format should a dieline be in?
A vector format such as .ai, .pdf or .svg, so every line stays exact at full size. We accept .ai, .pdf, .eps, .psd and .cdr files at 300 dpi.
Can I use a dieline from another printer?
Often, if the box style, size and board are the same. Send it with your artwork and our design team will check that it suits the material we will use for your box.
Who makes the dieline for my Pressholic order?
Our design team, at no charge. You send the size, style and quantity; we draw the dieline, place your artwork on it and send you a free digital proof to approve.